Puff Pastry Sheets

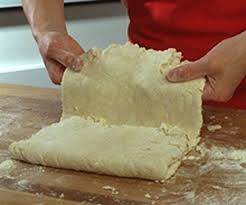
This buttery pastry is a light, flaky, rich pastry made by rolling dough with fat (butter or lard) and folding it repeatedly to form layers. Its versatility extends from sweet to savory, from desserts to main courses, from soup crust to hors d'oeuvres, including but not limited to canapés, tarts, turnovers, straws, breadsticks, rolls, puffs, palmiers, hot pies, pizzas and napoleons. They are great for bite-size desserts, or serving cups for appetizers.
To make puff pastry from scratch, it requires serious time to roll and chill in between the repeated folding process. Store bought frozen pastry sheets are pre-made dough to save the day without all the hours and elbow grease.
What to Buy
There are three main brands of puff pastry. I prefer all-butter pastry versions over those with vegetable shortenings for health reason and better taste. The all-butter versions also keep their flavor longer when cooled.
How to Use and Store
- Keep frozen until use
- Thaw completely
- Keep it cold while rolling
How to Use and Store
- Keep frozen until use
- Thaw completely
- Keep it cold while rolling

Needless to say, you should keep them in the freezer until ready to use.
 Frozen puff pastry sheet needs to completely thaw before you use it. If you can, take the package of puff out of the freezer and let it thaw in the refrigerator overnight. If you are pressed for time, set the pastry on the counter for about 35 to 45 minutes to thaw at room temperature, but keep a close eye on it as you want to catch the moment when it is pliable enough to work with but not so warm that the butter starts to melt and weep.
The main thing is to keep it cold while you are working, so the layers of butter remain firm. Stow the unused sheets in the refrigerator until you get to them. If the pastry gets too soft while you're rolling or cutting it, simply return it to the fridge or freezer to firm it up. If you're trying to create a specific shape, keep the pastry as cold as possible and it will be easier to make precise cuts. Use a sharp knife, a pizza wheel, a pastry cutter, or simple cookie cutters, and if you're after really straight lines, pull out a ruler or use a straight-edged baking sheet as a guide.
How to Roll

If your box comes with one large sheet, you can fold it crosswise in half and roll it out to create more layers. Cut out what you need, wrap the rest tightly and freeze leftovers for later usage.
 To prevent sticking, roll puff pastry out on a lightly floured surface, using a lightly floured rolling pin. Afterward, gently brush off any excess flour. If you're making a sweet recipe, you can use sugar or cinnamon sugar in lieu of flour, and for recipes made with cheese, you can use finely grated cheese.
 If you're blind-baking a pie or tart shell and want to keep the inside from rising as much as the edges, use a fork to prick the surface of the dough (like you would a regular pie crust). The pastry will still be light and flaky—it just won't puff up as much. If you need straight, even sheets of puff pastry for making a napoleon, bake the puff pastry between two baking sheets so it bakes into completely flat pieces.
Keep Liquid Out
 Frozen puff pastry sheet needs to completely thaw before you use it. If you can, take the package of puff out of the freezer and let it thaw in the refrigerator overnight. If you are pressed for time, set the pastry on the counter for about 35 to 45 minutes to thaw at room temperature, but keep a close eye on it as you want to catch the moment when it is pliable enough to work with but not so warm that the butter starts to melt and weep.
 The main thing is to keep it cold while you are working, so the layers of butter remain firm. Stow the unused sheets in the refrigerator until you get to them. If the pastry gets too soft while you're rolling or cutting it, simply return it to the fridge or freezer to firm it up. If you're trying to create a specific shape, keep the pastry as cold as possible and it will be easier to make precise cuts. Use a sharp knife, a pizza wheel, a pastry cutter, or simple cookie cutters, and if you're after really straight lines, pull out a ruler or use a straight-edged baking sheet as a guide.
How to Roll

Most frozen puff pastry comes in folded sheets. Unfold the pastry gently after it's thawed, and if you see any tears or holes, use your fingers—and a little water if necessary—to gently squeeze the pastry back together.
If your box comes with one large sheet, you can fold it crosswise in half and roll it out to create more layers. Cut out what you need, wrap the rest tightly and freeze leftovers for later usage.
 To prevent sticking, roll puff pastry out on a lightly floured surface, using a lightly floured rolling pin. Afterward, gently brush off any excess flour. If you're making a sweet recipe, you can use sugar or cinnamon sugar in lieu of flour, and for recipes made with cheese, you can use finely grated cheese.
Be careful not to roll puff pastry too thin, especially if making any kind of pizza or tart—the pastry needs to be sturdy enough to support the toppings and stay crisp.
How to Bake
 If you're blind-baking a pie or tart shell and want to keep the inside from rising as much as the edges, use a fork to prick the surface of the dough (like you would a regular pie crust). The pastry will still be light and flaky—it just won't puff up as much. If you need straight, even sheets of puff pastry for making a napoleon, bake the puff pastry between two baking sheets so it bakes into completely flat pieces.
Just before baking, brush your puff pastry with an egg glaze (one large egg lightly beaten with about 1 teaspoon water) to give it an attractive sheen. An egg glaze can also be used like an edible glue to seal the pastry edges for turnovers, empanadas, or any stuffed pocket-style pastry; just brush a thin layer along the edges and press them together gently.
Keep Liquid Out
Puff pastry is delicate, so be careful not to weigh it down with excessive toppings or ingredients that could release a lot of liquid and make the pastry soggy. Be particularly cautious with sticky fillings or ones that could overflow and make a mess of your baking sheets. And no matter what you're baking, line your baking sheets with parchment or a silicone baking mat, such as a Silpat, to prevent sticking.
Save the Scraps
If you have any pieces of puff pastry left over, combine them and roll them out to make palmiers or cheese straws. Leftover pastry won't puff up quite as much and it may be a little uneven, but that's less important with smaller shapes.
 |
| Puff Pastry Sheet versus Phyllo Dough |
Phyllo (Filo) Dough
 There is also frozen phyllo (or filo, means leaf in Greek) dough in the same section, that is not to be confused with puff pastry sheets. Phyllo dough is a very thin unleavened dough used for making pastries such as baklava, spanakopita and börek in Balkan, Greek, Middle Eastern and Eastern Mediterranean cuisines.
Phyllo-based pastries are made by layering many sheets of phyllo/filo brushed with melted butter or olive oil; the pastry is then baked. When it bakes up, the layers get airy, crisp, and flaky.
Phyllo dough can also make great edible serving cups for appetizers or desserts but phyllo dough and puff pastry sheets are different and can't be used interchangeably. Since phyllo dough consists of many fragile tissue-thin layers, it is delicate and won't hold the shape nearly as well as the puff pastry.
How to Use and Store
Phyllo dough can also make great edible serving cups for appetizers or desserts but phyllo dough and puff pastry sheets are different and can't be used interchangeably. Since phyllo dough consists of many fragile tissue-thin layers, it is delicate and won't hold the shape nearly as well as the puff pastry.
How to Use and Store
 Although you may be able to find fresh phyllo in Greek markets, they are easy to find in the freezer section in flat squares or rolls. Defrost in the refrigerator and not on the counter since it can get gummy. The main thing is to keep it from drying out. Keep the sheets covered with plastic wrap or a damp towel while you're working, and don't be discouraged if a sheet rips — just patch it back together and move on, it'll bake up just fine!
Note that don't refreeze phyllo, as it will get brittle.
Note:
- Vegetable shortenings are partially hydrogenated, which means they are infused with hydrogen atoms to create an oil that is solid at room temperature but melts at cooking temperature. The chemical reaction turns the oil in the shortening into trans fats.


